Thursday, November 10, 2011

Jambalaya- brought to you by Comfortable in my Skin

Today's recipe comes to you courtesy of Erin at Comfortable in my Skin
She has a wonderful blog with a nice mix of recipes, nail art and related posts, and hair and makeup reviews and tutorials. All round excellent blog.


I saw her recipe for Jambalaya, and I knew right away I would have to make it. It's the perfect fall comfort food. And deceptively easy to make.

All photos used are directly from Erin's blog, and used with permission.


Jambalaya

Ingredients:
1 medium onion, diced
2 bell peppers, diced (I used green but I'll be red would be lovely too)
2 cloves garlic, finely minced
6 oz sausage andouille preferred, I used Hot Italian
1 c uncooked, long grain rice
1 tsp paprika
1 tsp freshly ground black pepper
1 tsp dried oregano
1/2 tsp onion powder
1/2 tsp dried thyme
1/4 tsp garlic salt
1 bay leaf
2 c chicken broth (one box o' stock)
3/4 c water
1 Tbsp tomato paste
1/2 tsp hot sauce
1 28 oz can crushed tomatoes, juices too
1/2 lb peeled and deveined shrimp
2 Tbsp chopped parsley

In a large pot saute sausage until almost done. Add in onion, bell pepper, and garlic. Saute about 5 minutes over medium heat, until veg is softened. Add rice and the next 7 ingredients (through bay leaf), cook about two minutes. Add tomato paste and warm through, get it a nice brownish color. Then add your chicken broth, water, hot sauce, and tomatoes. Bring to boil. Cover, reduce heat and simmer about 20 minutes. Stir a few times, to make sure your rice isn't sticking too much. Add shrimp and cook about 5 minutes until they're nice and pink. Let stand 5 minutes. Sprinkle with parsley and serve.


Browning the sausage

Add the vegetable to the pot

Saute about 5 mins, or until staring to soften


Add the rice and the spices. 
Saute about 2 mins

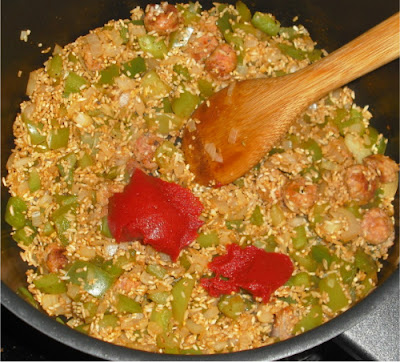
Add the tomato paste and warm it up.

Add all the liquid.


Sprinkle with fresh parsley, and there you have it. Super yummilicious Jambalaya!

MMmmmm thanks Erin!!

Please be sure and check out her blog by clicking here.

Happy cooking!


Thursday, September 15, 2011

Guest post from Claire at Purple Fairy Dust- Fajitas with a Twist

I am very excited to be hosting a guest post today by a lovely fellow blogger Claire, who has a wonderful blog called Purple Fairy Dust: All Things Beautiful
Claire covers a lot of fantastic things on her blog including recipes, craft projects, nail art, beauty, hair, fashion and reviews. I highly recommend that you check it out, as there is a post for everyone.

Claire tells me that this fajita recipe is one of her favorite dinner/lunch options, and she loves making it for company.
On to the yummy bits :)
The image above is owned by 


Fajitas with a Twist


Ingredients
Cooking Oil
Chicken breasts (can be made with beef)
Cheese (whatever you fancy)
Onions
Sweetcorn
Mayo - Optional
Garlic Paste/Chopped Garlic - Optional
Seasoning - Optional
Fajita Sauce - Optional
Fajita Wraps


You can add other vegetables but I choose not to.


Items you will Need - 
Frying Pan (to fry the onions)
Wok/Large frying pan (to cook the chicken)
Cup/Tupperware (to make your garlic mayo)
Grater (to grate the cheese)
Chopping Board
Sharp Knives x 2 (one to cut the chicken, one to cut the onions and garlic)
Wooden/Plastic Spoons x 2 (to stir the chicken/onions while cooking)
Bowl/Saucepan (for sweetcorn)

Please note ** Never use a spoon/knife you have been using to stir/cut chicken to stir/cut your onions.

Directions
Set all your ingredients out so everything is within reach.


Warm some cooking oil in a frying pan while you cut your onions (I always chop my onions first)  You can cut them to any size you want - My onions are cut up pretty small as I like them to be quite crispy.

Add the chopped onions to the frying pan.

You can chop you garlic here (if you are using it)

The onions will be cooking while you do the rest (please note if you don't want your onions crispy then you should wait to add the onions until your chicken is cut into pieces and is being added to the wok)


Don't forget to stir your onions every now and again.


Warm some cooking oil in a wok or large frying pan while you slice your chicken breasts (or beef) into sections/strips, removing all fatty bits and veins!

It is best to cut the chicken into small sections or strips so it fits easily into your wraps.


Cook the chicken until all the pink has turned white but leave on the heat as the inside may still be pink.  You can check if the chicken is ready by choosing the largest strip and cutting into it to see if it is pink, if it isn't the chicken is ready.  If it is pink just cook a little longer.

Once the chicken is ready or just about, then add the bbq seasoning (this is optional) but I find it yummy!  There are loads of seasoning sachets already made out there or you can make your own.

The onions should be cooked by now, you can leave them like this but I add some sugar (brown sugar works best) and mix it in with the onions in the frying pan.  This caramelizes the onions and make them taste gorgeous in your wraps!

Once the onions are ready put them into a dish/serving plate.
This is where it gets confusing.  I don't like the usual fajita sauce on my chicken but Tim does.  I split the chicken in to two frying pans/woks.  Mine is just the plain cooked chicken strips with the bbq seasoning thrown in so I add it to the pan I used for the onions.
Tim's chicken is in the other frying pan/wok so I add a sauce to it and leave to simmer.

While the chicken is simmering...

Add sweetcorn to a microwaveable dish and cover with water.  The sweetcorn can be the frozen or the tinned kind.  You can also use a saucepan to cook the sweetcorn.

Heat the sweetcorn for 30 seconds and stir, then another 30 seconds. Drain the water and put back into the microwave for another 30 seconds.  You will need to adjust the times for certain microwaves and if you are using a saucepan then you will have to boil the sweetcorn for 3 minutes at least.

Grate your cheese into a bowl or add the grated cheese to a serving dish like the one I have used below.

Add Mayo/Reduced fat Mayo to a cup or tupperware dish and add garlic paste or chopped garlic and mix.  I coat my wraps in garlic mayo before adding chicken, cheese, sweetcorn and onions... yum!

By this stage everything is ready so you can add the wraps to a plate, place them in the microwave and heat for 30 seconds.
Serve the chicken, sweetcorn, cheese, onions and wraps and give each person eating a plate to roll their wraps.


Sending out a huge thank you to Claire for sharing this yummy recipe, and I hope you all will try it and also check out her blog.
-Pam

Saturday, July 30, 2011

Holly's Red Headed Sl*t

Passed on to me by my friend and fellow nail polish lover Holly. I think I may try this one this weekend. I was looking for a new drink for PeleeFest

1 oz jagermeister
1 oz peach schnapps
cranberry juice to taste depending on how strong you  like your shots.

I am going to go with the standard 'shake with cracked ice and strain' method here because I have never made it before and I usually prefer my drinks chilled.

FYI- when you want to chill a shot down, but not water it down, make sure you FILL the shaker with ice. Most people tend to use too little ice thinking that too much will water it down a lot when in fact the opposite is true. The idea is to cool down the drink very quickly thereby melting as little ice as possible. More ice in the shaker=a quicker cool down. Less ice takes longer to cool it, and melts more of the ice.
So fill that shaker up with ice, shake the bajeebuz out of it, and strain it into the appropriate shooter or martini glasses.


Friday, July 29, 2011

My new favourite pork tenderloin.

I love pork tenderloin. It is always good, often on sale, and usually inexpensive. I have various marinades and basting sauces I have used, and while we often do a tenderloin on the grill, this one is in the oven and requires no marinading ahead a time-Which is perfect for my procrastination habits. :)


My Favorite Pork Tenderloin

  • 1 pkg. pork tenderloins (2 tenderloins, about 2-2.5 lbs.)
  • 4 garlic cloves
  • 1/4 cup soy sauce
  • 2 T. country dijon mustard (whole grain mustard)
  • 4 T. honey
  • 2 T. fresh orange juice
  • 1 T. finely chopped fresh rosemary OR herbs de provence
  • freshly ground pepper to taste
  • 3 T. olive oil
Yield: 1 cup of marinade.
Preheat oven to 350 F.

Take tenderloins out of package. Rinse and pat dry.
 Place in a 9x13-inch Pyrex sprayed with non-stick cooking spray.

Take a paring knife and poke holes in the tenderloins (on the top side only) about an inch deep. Peel garlic cloves and quarter each clove of garlic-lengthwise. If they're really big, cut them a bit smaller- about the size of slivered almonds. Place the garlic slivers in each pocket. Set aside while making marinade.

In a measuring cup or in a medium bowl, 
whisk together all the ingredients except for the olive oil. 
Then slowly drizzle the olive oil while still whisking.
Pour the mixture over the tenderloins and put into preheated oven. 
Bake, uncovered, for 45 minutes, basting once halfway through the baking process.
Once removed from the oven, allow the tenderloins to rest on a cutting board for about 10
minutes before slicing.            


You can see here that I actually overcooked it a little. It should be taken out of the oven at about 150 degrees, and left to rest, covered with tinfoil, on the counter for about 10 minutes, During that time the internal temperature will continue to rise and reach the optimal temperature of 160. My meat thermometer did not want to work, and I  overcooked it a tad. It should still be slightly pink in the center. It was still juicy though.

I served this with a zucchini vegetable concoction, and fresh corn on the cob.


For the vegetable concoction, I cut up Zucchini, onion and garlic and stir-fry that in a little vegetable oil until it starts to brown a little, then I add diced tomatoes, basil or whatever spices I feel like at the time, 2 tablespoons of balsamic vinegar and a little salt and pepper.
I often top this with goat cheese or feta cheese on the plates.


Spoon a little of the pan sauce over the pork medallions after you cut them up.
Delish!!


Friday, July 1, 2011

Coleslaw on Canada Day!

Happy Canada Day everyone!!!

Tomorrow we are heading to Pelee Island for the better part of the week, and since there isn't really any access to groceries etc over there we have to bring all of our food and water with us. On the menu for the week are simple suppers, all BBQ'd and simple sides that will leave us with left overs to pick at for lunches and snacks. One thing I have made ahead of time is coleslaw. It's easy, inexpensive and will last for the duration of our stay. It's even a yummy addition to a wrap. I used a very simple basic recipe, and there are about elebenty billion different versions of coleslaw. I chose not to put onions in this one, simply because I don't want to deal with the fallout of eating raw onions every day for a week.


Coleslaw ( I know this is a ridiculously creative name right?)

The crunchy stuff-
One medium head of cabbage, red or green
Matchstick cut carrots. -I use the bagged, pre-cut ones because I am lazy ;)
Onions of your choice- green onions, sweet onion, red onion.

Dressing-
1 1/4 cup Hellmans Mayonnaise **note- I much prefer actual regular full fat mayo for this, because the 1/2 fat mayo has a completely different taste-more like Miracle Whip- and in my opinion doesn't go as well in this dressing. But, other than from a flavour perspective low fat is fine if you want to use that.
1/3 cup sugar
1/4 cup apple cider vinegar ( Next time I make this I will be using raspberry red wine vinegar. I use that in my broccoli salad in place of cider vinegar and I like it much better)
1/4 tsp celery seed
1/2 tsp creole seasoning, or seasoning salt. I used Emerils Essence. You can find my recipe for that by clicking here
1/4 tsp black pepper (if you are still using that black dust people call pepper, go out right now and buy yourself a pepper mill. After you use it, you will thank me. GO! )
salt to taste

Shred the cabbage on a mandolin  or cut it veeeerrryyy thinly. OR go buy a bag of the pre-cut stuff.
Place that in a bowl with a few generous handfulls of the matchstick cut carrots, and onions if you are using them.

Mix all the ingredients for the dressing together in a glass jar with a tight lid, shake it up and let it sit for an hour or so in the fridge.
Dump it all together and give it a good stir, or mix it up with your hands.

I store mine in a large ziploc freezer bag. It takes up less room, easily transportable for vacation, and you can squeeze all the air out. I usually just flip it over a few times before I serve it to redistribute the dressing.

Hope you enjoy!

I would love to know what your likes and dislikes are for coleslaw, or if you have a favourite recipe for it.

Cheers!


Wednesday, June 29, 2011

Chicken and Coconut Curry

I love curry. Always.
This is a very quick, almost throw together recipe and while it was good, it needs a little tweaking for next time. More heat, and more curry paste. That's about it. And I think I will keep some of the green onions aside for tossing in at the last minute so they retain a bit more colour. They were tasty, but lost colour in the cooking process.


Chicken and Coconut Curry

3/4 pound skinless, boneless chicken breast halves cut into chunks ( I used 2 breasts)
1/4 tsp salt
1 tsp canola oil
1 red bell pepper cut into strips
6 scallions (or green onions) chopped
2 1/2 tsp Thai Red curry paste ( I would amp this up to at least 4 tsps next time)
2 tsp sugar
1 tsp ground cumin
1/2 tsp ground coriander
1 (14 oz) can of light coconut milk
1 (12 oz) pkg of cauliflower florets
1 (6 oz) bag of matchstick cut carrots

Sprinkle the chicken with salt. Heat1/2 tsp oil in a large non stick skillet over meadium- high heat. Add the chicken and cook, turning occasionally until browned and cooked through. About 5 minutes. Remove from pan, and keep warm.

Add the remaining 1/2 tsp oil to the skillet. Add the bell pepper and most of the scallions ( reserve some to add at the end so they retain some colour). Cook, stirring until the scallions turn bright green:about 1 minute.
Stir in the coconut milk, cauliflower and carrots; bring to a boil. Reduce heat and simmer, covered, stirring occasionally until the vegetables are tender; about 6 minutes longer.
Return the chicken to the skillet and cook until heated through; about 1 minute.

I like to serve this with jasmine or basmati rice.  

Tuesday, June 21, 2011

Balsamic and Garlic Crusted Pork Tenderloin

We don't eat a huge amount of pork but a tenderloin is one of our favourite cuts. It is easy to BBQ, and is always moist and juicy-If you don't over cook it. The trick is to take it off the grill when it reaches about 160 degrees, ( use a meat thermometer, it will be your new best friend) cover it and let it rest on the counter for 10 minutes before slicing. The temp will continue to go up, and the juices will spread more evenly through the roast. It should be just slightly pink on the inside. This does not mean it's underdone, or rare.
Alternatively you can cut the tenderloin into medallions bake them or pan fry them. I will post my favourite recipe for that soon as well. It's with apples and celery and cream... yum.


Balsamic Garlic Crusted Pork Tenderloin

  • 4-5 garlic cloves, finely minced or crushed
  • 2 tablespoons balsamic vinegar
  • 2 1/2 teaspoons coarse salt
  • 1/2 teaspoon freshly ground pepper
  • 2 tablespoons olive oil
  • 2 pork tenderloins (about 1¼ pounds each)


Whisk everything together in a small bowl, and put the pork in a large ziploc bag with the marinade for at least 30 minutes or over night.

Sear the tenderloins on all sides, then grill for about 20-30 minutes, rotating every 10 minutes, until the internal temperature is 160 degrees. Try to let it rest, covered for about 10 minutes before slicing.

I served this one with red pepper jelly because it was over cooked a little... oops.

Balsamic Salad Dressing

3 Tbsp olive oil
3 Tbsp fresh lemon juice
3Tbsp Olive oil
1 clove garlic, crushed
S&P
2 tsp Dijon or other grainy mustard
Herbs of your choice. Basil, tarragon,  or whatever you like
If you like it a little sweeter you can add a couple tsps of sugar, honey or sugar substitute.

You can just dump it all in a jar with a tight fitting lid and shake it up, but if you want it to really emulsify you pour the vinegar and lemon juice in a bowl and slowly drizzle the olive oil in  while whisking like mad to get it to emulsify. It doesn't really affect the taste, so it's not necessary really.

I like to serve this dressing over romaine lettuce and mixed greens with red onion, red or orange pepper, nuts of some sort ( usually almonds or pine nuts or pecans) and some dried cranberries.

Enjoy!
~Pam


Sunday, June 19, 2011

Barbecued Vegetables

Yesterday we spent the day outside, so a BBQ seemed appropriate. Just sausages and veggies-simple and fast.

We love BBQ'd veggies in this house, and have them usually once a week in the summer months. We BBQ in the winter as well, just not as often. We tend to roast them in the oven more in the winter.

I took some pics of the sausage as well, but they were not as...um... macro friendly, if you catch my drift.

We tend to do different variations of these veggies depending on what we have, and what spices are right there when I open the cupboard door. Garlic, S&P, red chili pepper flakes and basil are the standards, but Italian seasoning, parsley, paprika, thyme and rosemary make regular appearances as well. Seasoning salt would be fine by itself in a pinch. Sometimes is just the spices and EVOO and other times I add some balsamic vinegar as well.
You can also so a southwest version by substituting cumin, coriander, chili powder or any of those types of flavours.
Any veggies will work, just cut them up to the same size so they cook evenly. We often use zucchini, onion( usually a red onion, or vidalia but anything is fine), red peppers (or whatever colour pepper you  have/like), mushrooms ( usually cremini or portobello), asparagus, yellow squash and sometimes tomatoes. 
Eggplant also works well.
Sometimes we top the cooked veggies with fresh grated parmasan or romano, or crumbled goat or feta cheese, or sometimes shredded mozzarella. But lots of times we don't top it at all.

Basic recipe-

Cut up your veggies of choice into approximately same size chunks. I use one of each of the bigger vegetables and about 10 or so mushrooms.
Mince some fresh garlic according to your taste. You could also use whole cloves, just smashed with the flat side of a knife a little to release the flavour.
Put the veggies and garlic in a large bowl, or large zip lock bag and add your S&P, seasonings of choice (I am going to guess at about 1 tsp of each? [except the hot stuff]) I usually add more basil, cuz I love basil, and about 1-2 Tbsps of Olive oil. You don't want too much olive oil. Just barely enough to coat most of the veggies. And if you want to add some Balsamic vinegar do that here as well. Not much. maybe a teaspoon? lemon juice or white wine is a good alternative as well.
Toss that around in the bowl or bag, then dump that all into a BBQ grilling basket, ( we have one like this but anything like this will do) or if the tines on your grill are close enough together you can put it right on the grill. Our BBQ is archaic so we need the basket. It takes about 10 minutes, stirring regularly. 
If you want to put it in the oven throw them on a cookie sheet lined with aluminum foil, or any shallow pan, and roast in a 425 degree oven for about 30 minutes, stirring twice.

Super yummy and delicious.

Thanks for looking!
Enjoy!
~Pam


Thursday, June 16, 2011

Mexican Wedding Cakes or Russian Tea Biscuits

Ah the flavors of years past. My Mom used to make these every year for Christmas, and as soon as I popped one in my mouth to *cough* taste test it, I was reminded of Christmas. These are quick and easy to make, and freeze well. I might add, they taste good frozen as well.  There are as many names for these little gems as there are recipes. I have several versions and this one is my favorite. It is on the sweeter side, but I like sweet things.


Mexican Wedding Cakes   325 degree oven for 20 minutes

1 cup butter
3 TBSP icing sugar ( plus more for rolling the baked cookies in)
2 cups cake and pastry flour
1 tsp vanilla
1 cup finely chopped pecans (you could substitute walnuts or almonds)

In a medium sized bowl cream the butter and 3 Tbsp Icing sugar together until smooth.
Add 2 cups of flour, vanilla and chopped ( or ground) nuts. Beat again until mixed.

Roll into medium sized balls, or alternatively you could roll them into crescent shapes. But I am far to anxious to get these babies into the oven so I can eat some, so for me balls it is. Plus that's how Mom did it. ♥
Bake on a cookie sheet at 325 for about 20 minutes. Don't over bake them.

While they are still warm, (not hot, be reasonable here)  roll them in icing sugar. I usually put a cup of sugar into a bowl and that way I can pop a few cookies in a once and swirl them around to coat.

After you take them out you might find some of the icing sugar has melted into the cookie especially if you have done it while they are really hot. Just sprinkle some more on there and you are good to go.

This recipe makes about 30 or so cookies

Enjoy!
~pam

LOVE OF THE SEA: Watermelon Wednesdays-A refreshing gazpacho...

LOVE OF THE SEA: Watermelon Wednesdays #5.... A refreshing gazpacho...:
**Disclaimer: I have NOT tried this recipe, but I plan to very soon and I will report back with my findings.**

I found this awesome looking recipe on a blog I read called Love of the Sea. You can click the link above to go directly to her page with the recipe. It's for a watermelon gazpacho, and I thought it looked like a refreshing treat on a hot day. I LOVE watermelon.
This recipe originally came from Martha Stewart. Well not actually right from her, but rather from her website.  ;-)


Ingredients:
5 cups peeled, seeded, and roughly chopped watermelon

  • 1/2 cup cranberry juice
  • 1 cup peeled, seeded, and diced cucumber
  • 1 cup diced celery (about 2 stalks)
  • 3/4 cup diced red bell pepper (about 1 pepper)
  • 1/4 cup diced red onion
  • 1/4 cup fresh mint leaves, minced
  • 1/4 cup fresh parsley, minced
  • Juice of 1 lime (about 3 tablespoons)
  • 1 1/2 tablespoons sherry vinegar
  • 1 tablespoon jalapeno pepper, minced

DIRECTIONS:

  1. Combine 5 cups watermelon and the cranberry juice in the jar of a blender, and puree until mixture is smooth. Pass through a fine sieve into a large bowl or plastic storage container, discarding pulp. You should have 3 cups strained liquid.
  2. Add cucumber, celery, bell pepper, onion, herbs, lime juice, vinegar, jalapeno, and remaining cup chopped melon to watermelon liquid, and stir to combine. Cover with plastic wrap, and place in refrigerator until soup is well chilled, at least 1 hour. Serve, or store in refrigerator up to 1 day

Wednesday, June 15, 2011

Steak Fajitas

Since I had oodles of steak left over from yesterday's dinner, and some avocado's I needed to use I decided Steak Fajita's were perfect. They were fast and yummy. I didn't have anything to go with them so I just had a handful of PC lime and habanero tortilla chips and they were quite tasty.


Steak Fajitas

Steak of your choice. I used two left over T-bone steaks from yesterday. This also works well with chicken.
**if you didn't season your pre-cooked steak, or if you are using raw meat, increase the amounts of spices a bit**
1/2 tsp garlic powder  or 1 garlic clove, minced (used powder this time)
Vegetable oil
1/4 tsp red chili pepper flakes or cayenne pepper, whatever you like for heat
1/2 tsp ground cumin
1/2 tsp dried oregano
juice from 1/2 a lime ( about 2 TBSPs?) If you dont have lime juice you could use lemon juice, or white wine.
one red pepper, sliced
one green pepper, sliced
1/2 an onion, sliced ( I used vidalia because that's what I had. Anything would work)
S&P
sour cream, avocado, plum tomato, shredded cheese, or whatever topping you like on your fajitas
Whole Wheat tortilla wraps

Thinly slice up the pre-cooked steak, (or raw if you are not using left overs) Heat up about a TBSP of oil in your frying pan over med-high heat, and toss in the steak. 
Sprinkle with S&P if you are using raw, or didn't season your grilled steaks, chili flakes OR cayenne, cumin, oregano and garlic powder. Heat that up well, while stirring fairly regularly. When its pretty much heated through, add the lime juice all at once, give it a good toss around then in less than a minute dump it out into a bowl to keep warm while you saute the veggies.

While the pan is still hot and has some remnants of the steak juice and oil in it, toss in the peppers and onions with a little S&P, and a little more of the cumin, oregano and chili pepper flakes. Toss them around in the pan until they start to brown up a little and soften a little. You want the pan to be hot and dry enough to saute them without steaming them and making them too soft.

Now you are ready to put together your fajita. First warm up your tortilla in the microwave for 10-15 seconds to make it more pliable and less likely to tear. After it's warm I usually slather some sour cream on the wrap first, then add a few pieces of steak, then the pepper/onion mix, then some avocado, seeded and sliced plum tomatoes ( I use plum tomatoes because they are usually less watery and more meaty) and sometimes I add shredded cheddar or Monterey Jack.

I always use saran or waxed paper or aluminum foil around my wraps. It keeps them from falling apart, and helps contain the juices better. It's really easy if you wrap it up, cut it in half then peel back the wrapping as you eat it.

Normally I might make this with some spanish rice but I totally didn't have the time or energy.

Enjoy!
~pam

Tuesday, June 14, 2011

Let's see what we have in the fridge....

Tonight's dinner was made up of whatever I could put together from whatever I had already. I had a few steaks that I had taken out yesterday, and didn't get to cook so we grilled those, BBQ'd some potato packets, and I made a veggie concoction.


Potato Packets:

I peeled and sliced up some potatoes, sliced some onion (I think it was a sweet onion?) and tossed that in a bowl with  some melted butter, salt, pepper, garlic powder, rosemary, parsley and some fresh thyme. I mixed that all up in the bowl and put single serving portions in some aluminum foil and wrapped it up and threw them on the grill first.

Veggie concoction: (I started this about the same time as we threw the steaks on the grill)

I used some zucchini I had (that had actually seen better days but we won't talk about that),  half an onion, two plum tomatoes, garlic and (sort of) fresh basil, balsamic vinegar, salt and pepper and red chili pepper flakes and some goat cheese. It was actually super delish. I sliced the zucchini into 1/4 inch thick circles, then cut those into semi circles, diced the onion, minced the garlic, seeded and chopped the plum tomatoes, tore up the basil and crumbled the goat cheese. (I do that by putting it into a small bowl and using two knives to slice it up.)
First I heated up some veg oil and butter in a non stick skillet, and sauteed the zucchini, onion and garlic with S&P,  until they started to get some colour. When they were browned to my liking, all at once I tossed in the tomatoes, basil, red chili pepper flakes and about 1 TBSP of balsamic vinegar, and stirred that for less than a minute. I served it with some goat cheese sprinkled on top.

I didn't do anything special for the steaks. Just a sprinkle of steak spice and grill them on super high heat for about 3-5 mins a side, (depending on how you like them done. I like them med-rare) then we let them rest on the kitchen counter for a few minutes to let the juice distribute itself all over the steaks.

Simple and delicious.

Friday, June 10, 2011

Veggie Pizza with Zucchini and Goat Cheese

I never seem to eat enough pizza, which is a shame, because I  love pizza. Veggie pizza is my absolute favourite. This was a throw together pizza because I didn't get home from dance rehearsal until late, and I needed to eat so I could go to bed. This was pretty darn delicious... or maybe I am just REALLY hungry :)

Veggie Pizza with Zucchini and Goat Cheese

One store bought thin crust pizza or flat bread. ( I used a PC flat bread here) Or if you are really ambitious (and I am not) you could make your own pizza dough.
Olive oil
Presidents Choice Tomato Pesto ( this is my new favourite pizza sauce/topping)
one small zucchini sliced thinly into rounds then halved
one green onion, diced
one plum tomato, thinly sliced
salt, pepper, basil, red chili pepper flakes or whatever you like
goat cheese

I like to do my pizza on the grill, but it was too late at night to be firing up the grill so I did it in the oven on my grill pan. It's basically a cookie sheet with holes in it. First this I do is heat the oven to 425, and put the grill pan in the oven to heat it up. While that is heating I brush the underside of the pre-cooked pizza crust or flat bread with olive oil. 
Heat up a skillet and when it is hot pour some olive oil in, and when that is hot, toss in the sliced zucchini with some salt and pepper.
Now the pizza grill pan should be good and hot, so you can put the crust in to warm and crisp up a bit on the bottom.
When the zucchini has softened a bit, sprinkle it with some basil and the diced green onion.
When the pizza crust has warmed up, take it out and spread some PC tomato pesto all over it., top that with some crumbled (more like mushed) goat cheese, then the zucchini/onion mixture, and top that with the sliced tomatoes. Pop that in the oven for a few minutes to warm the tomatoes and you are good to go.

Thanks for looking.
Enjoy!